
A journey in the lands of the Mighty Tatras. Clans of corrupt lords, vile beasts and mischievous spirits strive for domination.
Recruit the animals of the Tatras to your band. Battle, form alliances, develop industries and construct buildings. Beware of spirits, devils, demons, shamans and dragons. Reclaim and rebuild the Tatra mountains!
1. Objective

Control all areas by defeating their rulers in battle, by forming alliances or by forcing beasts and spirits upon them. The game ends when any of the following conditions are met:
- all areas have been conquered or allied; all coins on white side (gain five points).
- all wooden cubes are placed on the Beasts and Spirits cards.
- the deck of Beasts and Spirits is exhausted (you have to draw a card and cannot).
Score the points from your goal card. Add three points for every wooden cube, treasure and dragon tile left.
2. Game Flow
Every turn, draw a Tatra card. Then perform the effects on the Beasts and Spirits cards: add cubes, flip industry tiles or discard animals cards. Then play your own animal cards' actions, or the general actions.
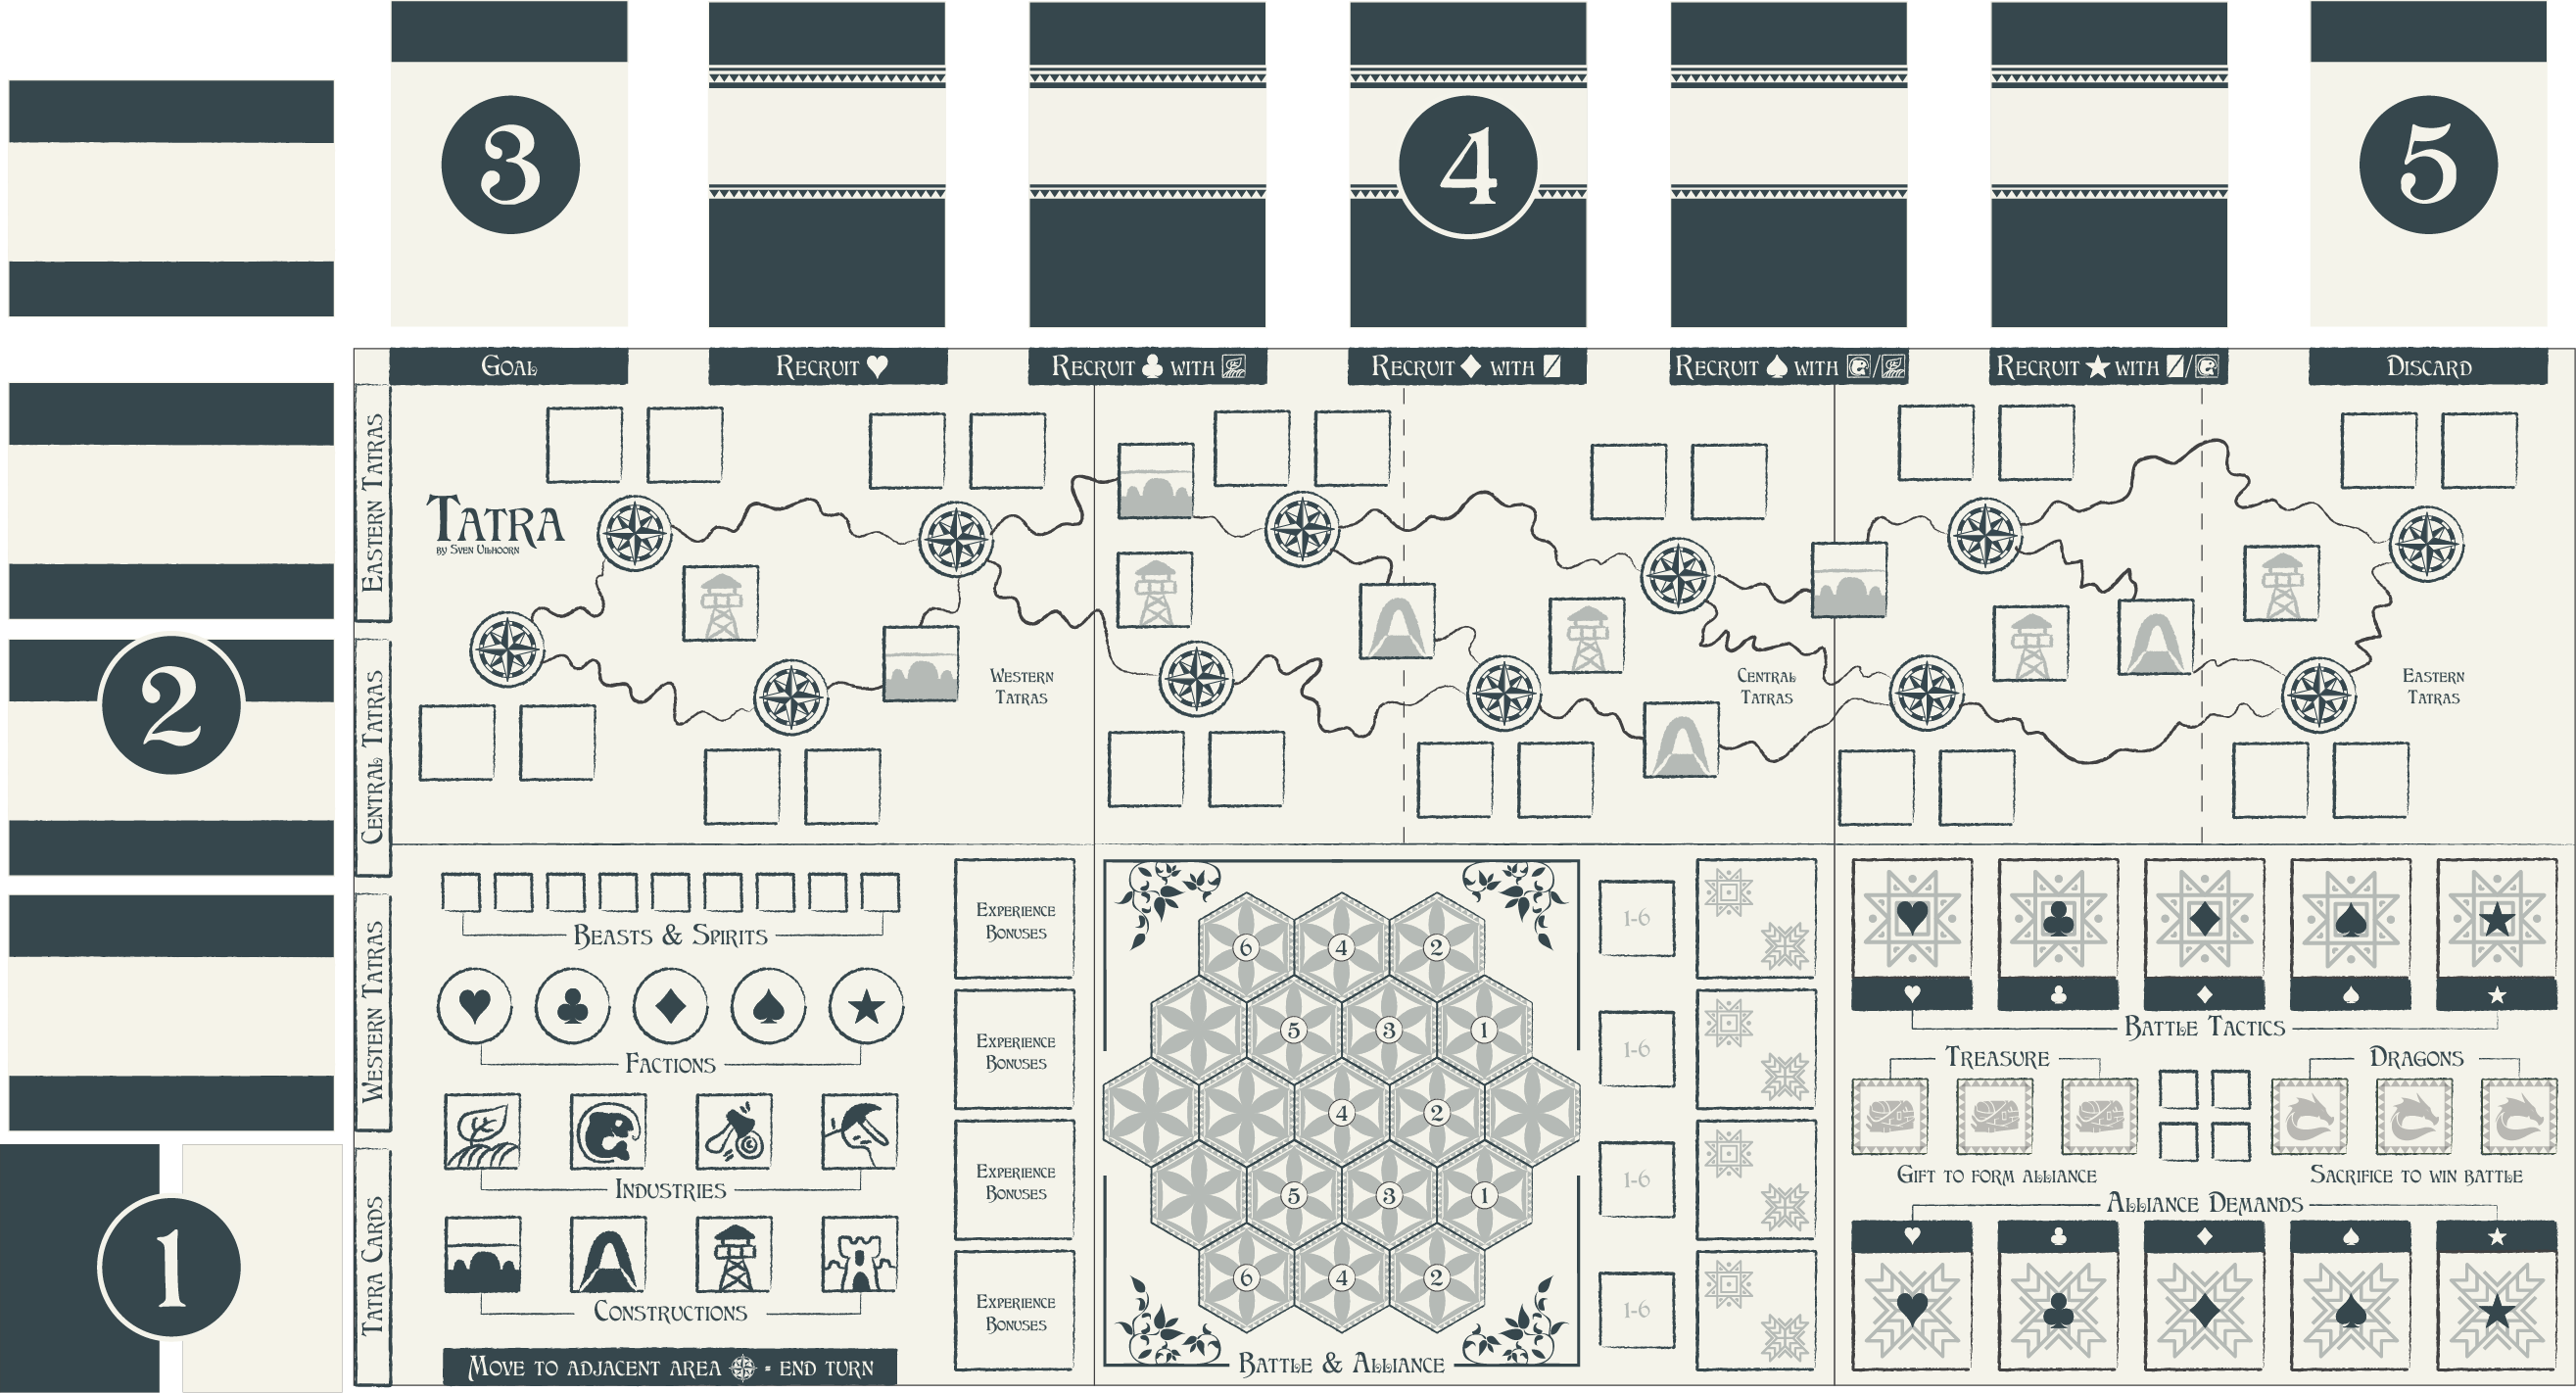
Three regions (Western, Central and Eastern Tatras) consist of twelve areas. In allied areas, you can recruit, develop industries and construct buildings. In enemy areas you can scout, negotiate, battle and/or form alliances.
Components
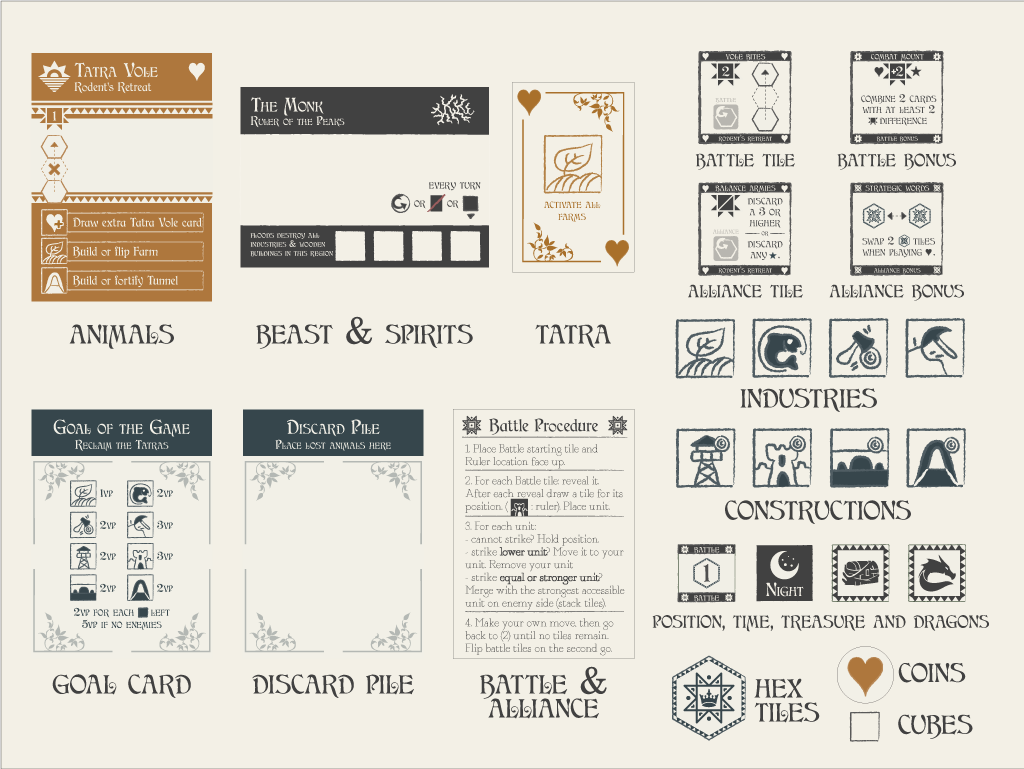
- Game Board.
- Cards: 12 animal cards of each suit, 15 Beast & Spirits cards, 10 Tatra cards, one goal card, one discard pile card, one Alliance overview card and one Battle overview card.
- Large 32x32mm tiles: Six battle and six Alliance tiles of five suits, 15 Alliance bonus tiles and 14 Battle bonus tiles.
- Small 20x20mm double sided tiles: 8 farms
 , 8 fisheries
  , 4 lumber camps
  , 4 quarries
  , 3 strongholds
  , 3 towers
  , 3 tunnels
  , 3 bridges
  , 16 double sided battle/alliance position tiles, 3 treasure tiles
  , 3 dragon tiles
  .
. - Hexagonal tiles: 6 double sided tiles.
- Parts: 4 coins of each suit (white is allied side, black is enemy side), 14 wooden cubes (four colored), 3 jute bags.
3. Setup
Place the game board.
3.1 Cards Surrounding Board
- Place the stack of Tatra cards, face down, to the bottom left of the Tatra board. Leave space on the left to play Tatra cards.
- Place the stack of Beasts and Spirits face down, to the top left of the game board. Draw three cards, one card for each region (Western, Central and Eastern) and place them between the Tatra cards and the Beasts and Spirits stack, face up.
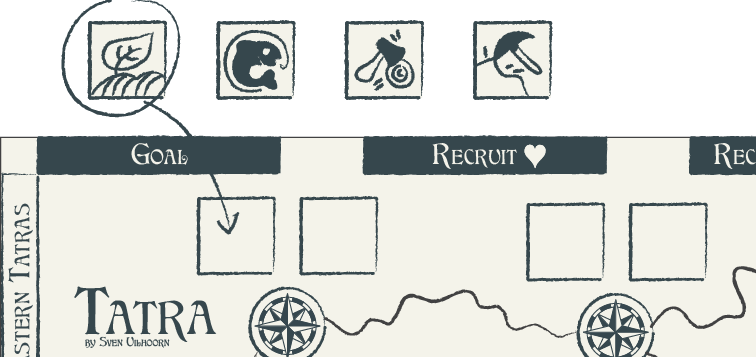
- Choose between a short, medium or long game. Place the corresponding goal card face up on the Goal space on your player board.
- Separate the animal cards in their five suits. Place the five decks (of each suit) face down to the top of the game board in the order of hearts, clubs, diamonds, spades and stars. Reveal the top card for each stack.
3.2 Cards and Tiles on Board
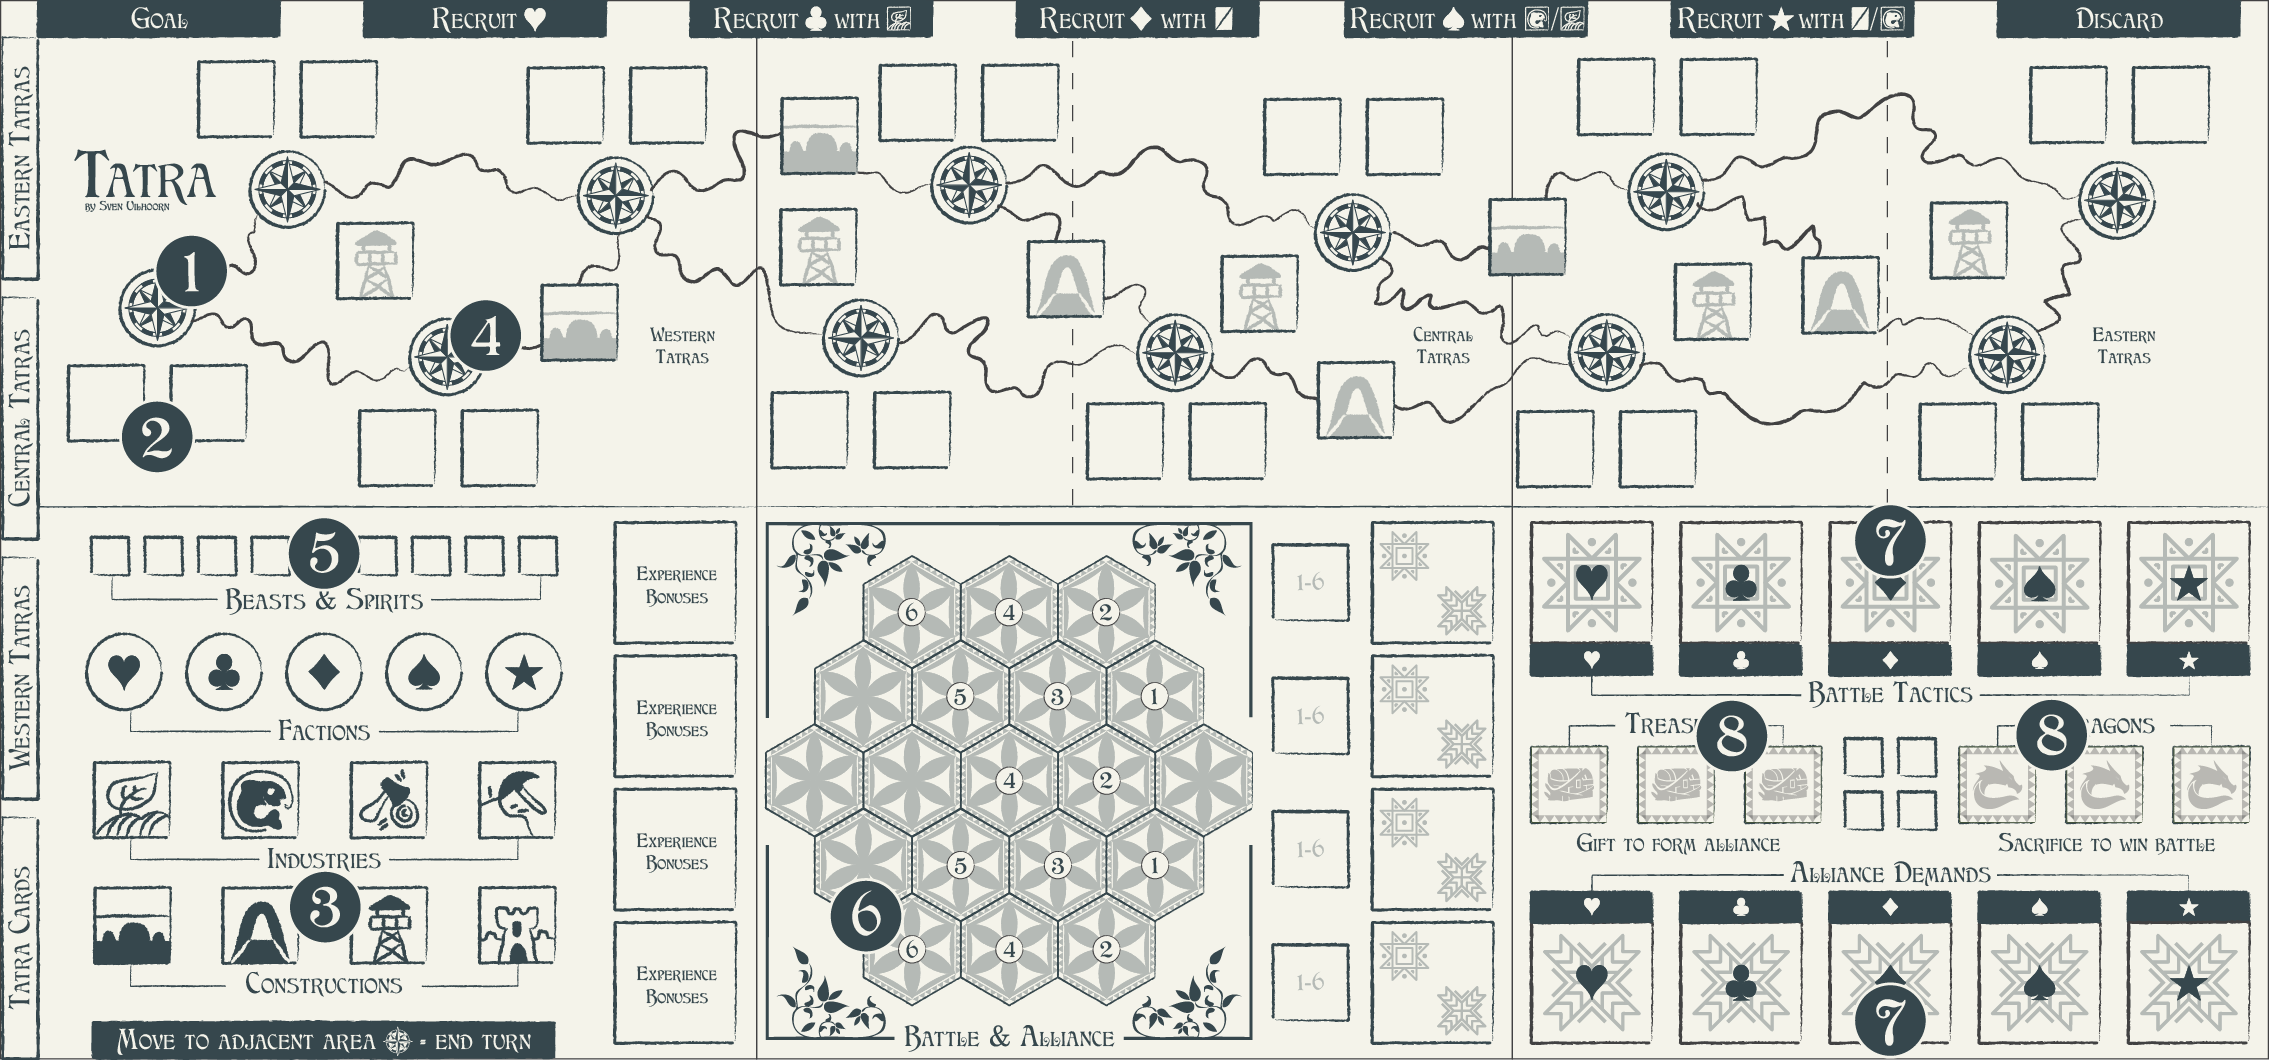
- Place a faction coin on each area (space) on the Tatra Board. Depending on your chosen game length, flip any 8 (short), 4 (medium) or 1 (long) coin(s) to allied (white background) side; the other coins should be on the dark (enemy) side. Place the remaining coins stacked on each of the suits on the faction coin spaces (bottom left of game board).
- Place a building/industry for each disc:
 Stars: a tower connected to their areas in Western Tatras.
 Clubs: lumber camp , a quarry in Eastern Tatras
 Spades: fishery on areas in Central Tatras, a stronghold on areas in Eastern and Western Tatras.
 Hearts: farm on each area.
 Diamonds: a bridge connected to areas in Central Tatras.
- Place the remaining industry and building tiles on their respective spaces on the game board (bottom left), wooden and stone
 side does not matter. (to save time you can just keep them in the bag or place them aside the game board)
 - Choose an allied starting area, either the leftmost or rightmost allied area. Place a wooden cube on its coin.
- Place nine wooden cubes on the "Beasts & Spirits" track.
- Place the six hexagonal Battle/Alliance hex tiles
 &
&  at the side of the Battle & Alliance board.
 - For each suit, place the six Battle tiles
 and six Alliance tiles
  face down on their spaces.
 - Place the three treasure tiles (faded side up), the four cubes (red, white, blue, black) and three dragon tiles (faded side up) on their spaces.
3.3 Cards and Tiles in Hand
- Place the battle unit tiles (red, white, black and blue), and the Battle and Alliance overview cards within reach.
- Place the three bags with Battle bonus tiles (large), Alliance bonus tiles (large) and Battle/Alliance position tiles (small) within reach.
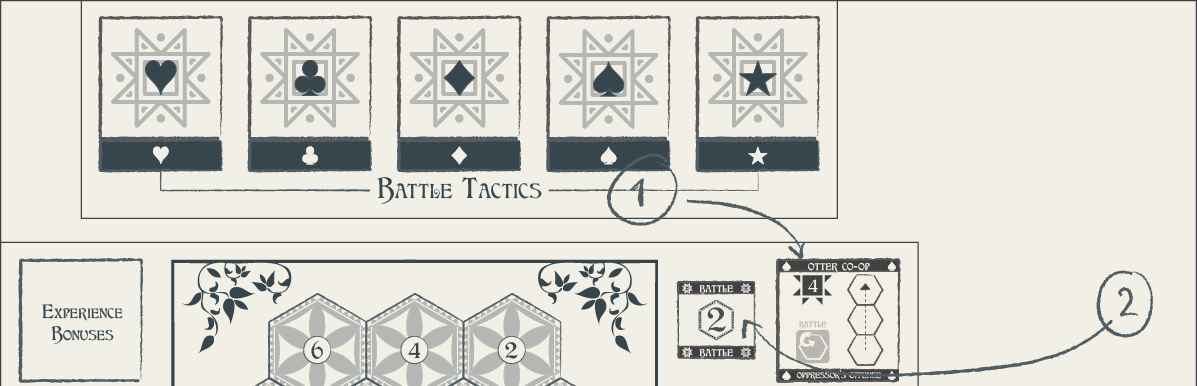
- Draw two experience bonus tiles. You may draw from any of the two bags. Place them on your top experience bonus tile spaces in drawing order (first tile at the top).
- Draw three animals cards from allied suits (coins with white side up). You may draw multiple cards from one stack. After drawing all three cards, flip the top card of all decks face up again.
Tip: draw cards of the suits of experience bonus tiles drawn. This will give you an advantage in battles and/or forming alliances.
4. Tatra, Beast & Spirits
At the start of every turn, draw and perform the action on the Tatra card, then go through all three Beasts and Spirits.
4.1 Tatra Cards
Draw a Tatra card. Perform the action. These actions are:
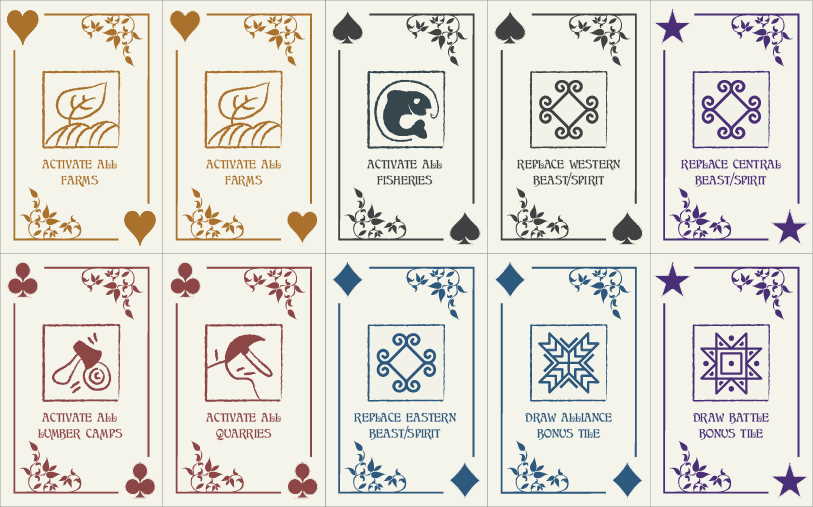
- Flip all inactive (
 ) industry tiles of this type to active ( ) .
 - Draw a Beasts & Spirits Card to a region: Western, Central or Eastern Tatras (if the current card has no cubes on it). Place on top of the current card.
- Draw an Alliance Bonus tile from the bag.
- Draw a Battle Bonus tile from the bag.
4.2 Beasts & Spirits
If there are no cubes left on the Beasts & Spirits track, the game ends.
Perform the actions on the Beasts and Spirits' cards. They are each tied to a region (Western Tatras, Central Tatras or Eastern Tatras). First perform Western Tatras, then Central Tatras, then Eastern Tatras. Beast and Spirit cards can have positive (left) and/or negative (right) effects.
Either fulfill their demand every turn or move a cube from the Beasts & Spirits track to the card (any space), which represents their dissatisfaction. If all spaces on the card are filled during a turn, flip any allied coin in this region to its enemy side.
Tip: on your first game, choose for cubes to place on a card instead of cards to discard, until you feel comfortable discarding cards.
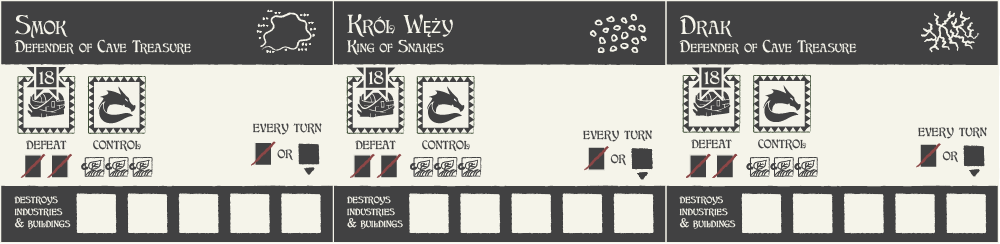
4.2.1 Draks, Smoks & King of Snakes
Draks are land specific, Smoks are water specific. These dragons guard treasures, are malevolent and can keep up to five cubes. When you defeat the dragon, gain treasure. You can tame a dragon by making sacrifices.
Defeat dragons by having more battle value than the dragon can handle (18). Discard two cards. Tame dragons by flipping three farms in that dragon's region (to consumed).
When active, every turn either discard an animal card ![]() or add a cube
or add a cube ![]() to the beast's card. If all spaces have cubes, execute the effect on the bottom left of the beast's card.
to the beast's card. If all spaces have cubes, execute the effect on the bottom left of the beast's card.
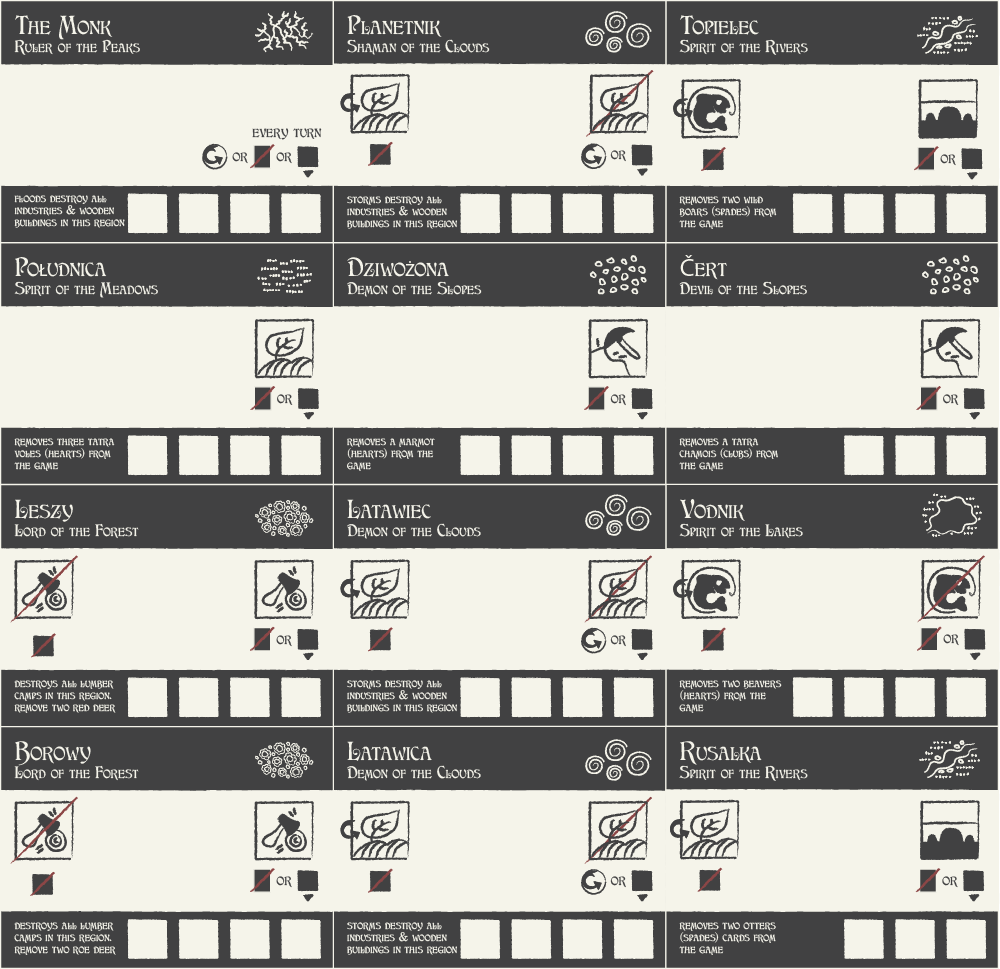
4.2.2 Shamans, Spirits, Demons and Devils
These were often shape-shifters, controlling winds or leading travellers astray. Others stole, drowned victims or caused madness. They are often malicious, but can also be harmless or even helpful.
Negative effects are on the right side of the card. If this industry exists or this building is constructed in the region of the spirit, either flip a coin in that area to enemy side ![]() , discard an animal card
, discard an animal card ![]() or place a cube on this card
or place a cube on this card ![]() . If all spaces on a card have cubes, execute the effect on the bottom left of the spirit's card.
. If all spaces on a card have cubes, execute the effect on the bottom left of the spirit's card.
Positive actions are on the left side of the card; if you flip that industry, you can move a cube back to the Beasts & Spirits track when there are cube(s) on the card.
5. Actions
You may choose one action for each animal card played in front of you:
- Recruit
- Scout
- Negotiate
- Develop Industry
- Construct Building
Or from general actions, which also end your turn:
- Mobilize
- Battle/Alliance
5.1 Recruit
"We need more of us, widening our skill set to construct, develop and improve chances in negotiation and battle."
Place any animal card in front of you. Draw an animal card of any of the animal cards held, animal cards played in front of you, or from suit of any allied ruler (white sided coins).
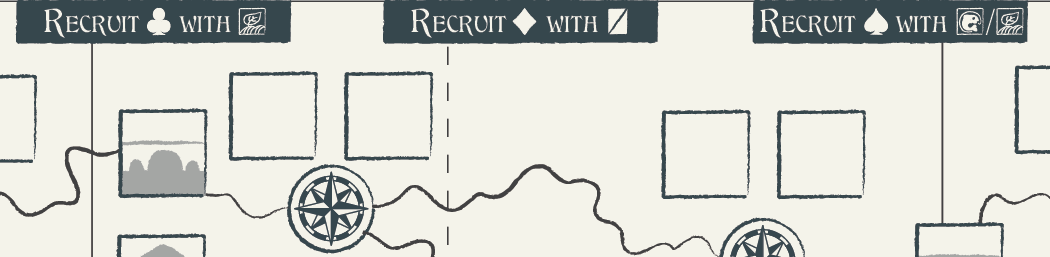
If an industry or card is required (see top of the game board), flip any allied farm ![]() or fishery
or fishery ![]() or discard an animal card
or discard an animal card ![]() . The recruited card cannot be used this turn. After drawing, place the top card of that deck face up.
. The recruited card cannot be used this turn. After drawing, place the top card of that deck face up.
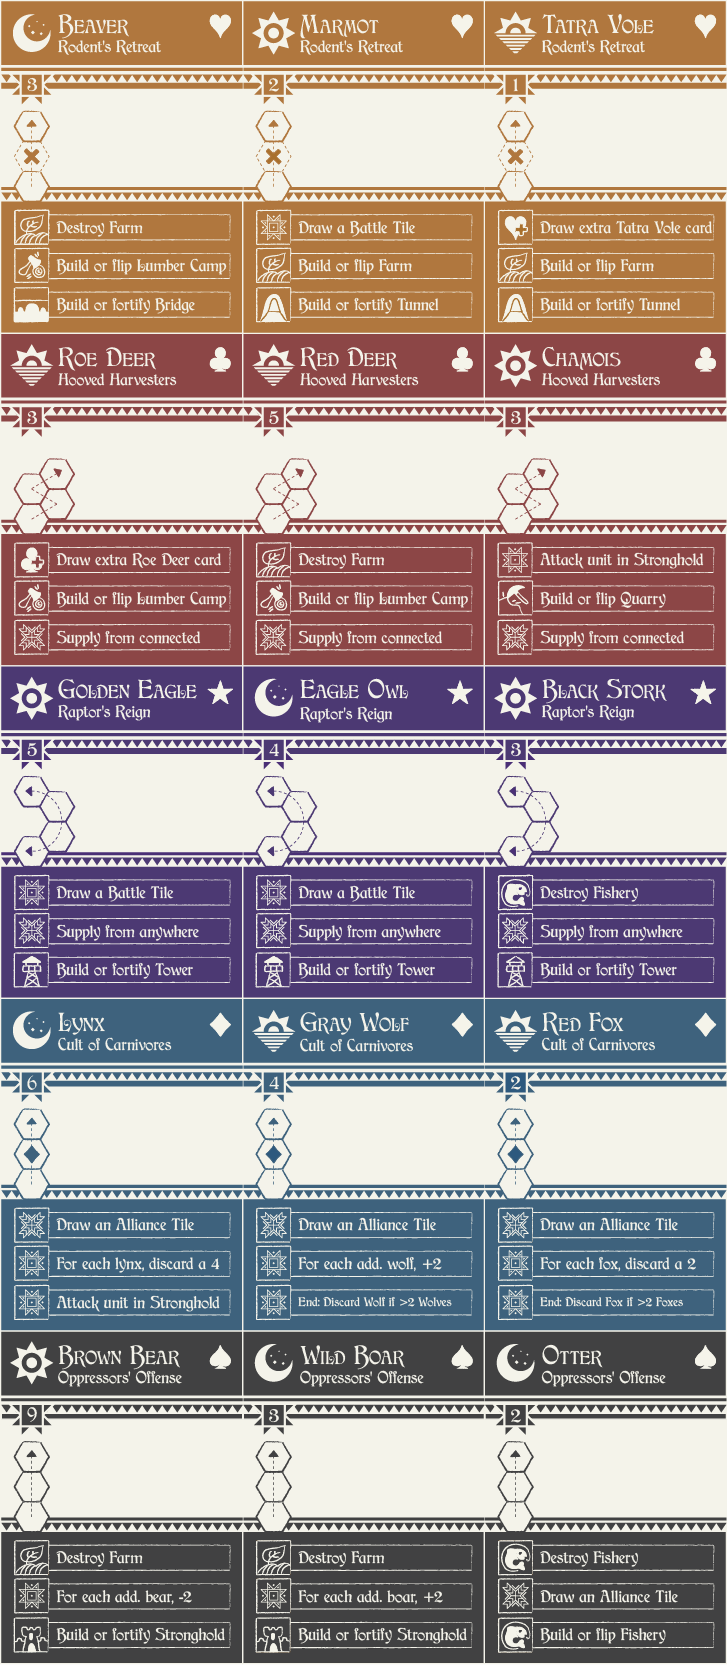
Voles and Roe Deer can draw the top card for free if it is their own species. So if you play Recruit with a Vole and another Vole card is face up, draw this, then draw another card, where drawing from the hearts deck would be face down.
5.2 Scout
"Arrived at enemy camp, we don't know what we're facing! Thorough scouting will prepare us for battle."
Reveal a ![]() Battle tile of the suit of the Ruler of the current (enemy) area.
Battle tile of the suit of the Ruler of the current (enemy) area.
- Place it on the topmost open space to the right of the Battle/Alliance board.
- Draw a position tile from the bag and place it left of the Battle tile, with the Battle side face up.
- This only provides information, do not place the Battle/Alliance hex tiles yet.
Golden Eagles, Eagle Owls and Marmots can reveal two battle tiles in one turn. When there is a connected tower and you use a Golden Eagle or Eagle Owl, reveal all tiles.
5.3 Negotiate
"When looking for peace, we depend on our diplomatic qualities, exploring the demands of our opposition."
Reveal an ![]() Alliance tile of the suit of the Ruler of the current (enemy) area.
Alliance tile of the suit of the Ruler of the current (enemy) area.
- Place on the bottommost open space to the right of the Battle/Alliance board.
- Draw a position tile from the bag and place it left of the Alliance tile, with the Alliance side face up.
- This only provides information, do not place the Battle/Alliance hex tiles yet.
Lynx, Gray Wolf, Red Fox and Otters can reveal two alliance tiles in one turn.
5.4 Develop Industry
"Everyone is hungry for produce and fish, we also need wood and stone for houses and defense!"
To develop an industry in the current (allied) Area, use an animal with the ability to develop that industry:
- Farm ( Voles, Marmots)
- Fishery ( Otters)
- Lumber Camp ( Roe Deer & Red Deer)
- Quarry ( Chamois)
Industries are useful for recruiting, pleasing the beasts and spirits and constructing buildings (see below).
5.5 Construct Building
"Bridges and tunnels will improve logistics. Towers and Strongholds allow us to scout and defend better."

To build a building in or connected to the current (allied) Area, use an animal with the ability to build that building:
- Stronghold ( Bears and Boars)
- Tunnel ( Voles and Marmots)
- Bridge ( Beavers)
- Watch Tower ( Golden Eagle, Eagle Owl, Black Stork)
Each building requires a lumber camp or quarry to be flipped. For wooden ![]() , flip an allied lumber camp from
, flip an allied lumber camp from ![]() to
to ![]() .
For stone
.
For stone ![]() construction, flip a allied quarry from
construction, flip a allied quarry from ![]() to
to ![]() . Then place the construction on the Tatra board.
. Then place the construction on the Tatra board.
Tunnels, bridges and watch towers are built between areas. Strongholds are built in an allied area ![]() and require an empty space next to the area coin.
and require an empty space next to the area coin.
5.6 Mobilize
"When it's time to pack up and move to new areas, we move as one."
Move your band to an adjacent area. Some paths require a tunnel ![]() or bridge
or bridge ![]() to be constructed in order to move through them; ignore this if you only have birds (stars suit) cards. At the end of this action your turn ends.
to be constructed in order to move through them; ignore this if you only have birds (stars suit) cards. At the end of this action your turn ends.
Moving out of an enemy area removes all battle, alliance and position tiles from Scout and Negotiate actions.
5.7 Battle/Alliance
"We have to restore the Tatras. But will we venture into battle mode or fulfill demands for a more peaceful path?"
In an enemy area (dark sided coins), you may choose to either Battle (see 6. Battle) or Negotiate to form an Alliance(see 7. Alliance). Any animal cards you have used for other actions this round cannot be used during this action.
Tip: try to reveal at least three Battle or Alliance tiles before deciding to Battle or Alliance; Battles often require thorough planning, good use of experience bonuses or powerful animals. Alliances often require plenty of industries and (lower) cards to discard. At the end of this action your turn ends.
5.8 End Turn
After you have placed all of your cards in front of you, or when you decided to mobilize or battle/alliance, your turn ends. Take back the cards you played or recruited. Discarded cards stay on the discard pile. Start the next turn.
Animal Cards
6. Battle
The cards in your hand are your troops. During battle, you can make divisions of two cards with the possible paths. Take into account the battle strenght ![]() of your divisions and those of the enemy troops.
of your divisions and those of the enemy troops.
When you are in an enemy area (coin with dark background), you can choose to battle. Battle Tiles ![]() are used to resolve the battle with the ruler’s army. During Battle, you play alternating turns. The enemy starts.
are used to resolve the battle with the ruler’s army. During Battle, you play alternating turns. The enemy starts.
Dragons ![]() can be used to instantly win any battle. Flip the tile to the dark side when using a dragon for a battle.
can be used to instantly win any battle. Flip the tile to the dark side when using a dragon for a battle.
You can reveal Battle Tiles through the Scout (5.4) action to have more information before going into negotiations.
6.1 Battle Procedure

When you are in an enemy area ruled by spades:
- Draw the top battle tile from the stack at "Battle Tactics" and place it on the top space right of the Battle Board.
- Draw a position tile and place it Battle side up.
- Place the hex (#1 for first unit) on any of these #2 positions.
- If multiple battle and position tiles have been revealed before going into battle, place all the hexes for these (hexes can be stacked). Otherwise play your first move.
6.1.1 Place Hexes
Place the Ruler's location hex tile (right of the Battle board) face up. If there are any Alliance tiles on the track, remove them and their position tiles.
If a Stronghold ![]() is built in this area, do not draw position tiles. All enemy units start at the Ruler's location.
is built in this area, do not draw position tiles. All enemy units start at the Ruler's location.
6.1.2 Draw Battle Tiles
Draw and reveal the remaining Battle tiles in top to bottom order. Draw a Battle/Alliance position tile ![]() for each Battle tile and place with the battle side face up.
for each Battle tile and place with the battle side face up.
6.1.3 Place Enemy Units
After every tile reveal, place the unit ![]() (use hex tile #1 for the top unit, down to #4 for the bottom unit) and go through the Battle Overview card. Based on the movement options on the Battle tile:
(use hex tile #1 for the top unit, down to #4 for the bottom unit) and go through the Battle Overview card. Based on the movement options on the Battle tile:
- If they cannot directly strike, they will hold position.
- if they can strike and your unit has less strength, they will strike and remove your unit.
- if they can strike and your unit has equal or more strength, they will merge with the strongest accessible unit on their side (stack these tiles). If they cannot merge, they will return to the Ruler's location.
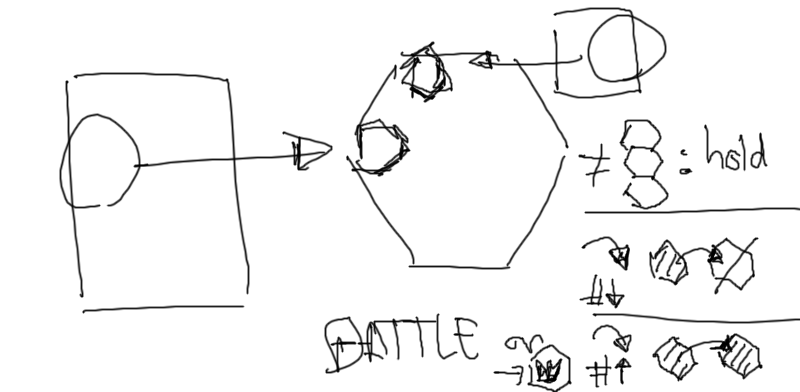
Scenario A: Assuming it's the enemies turn:
- Assuming the battle tile is on position six.
- The animals movement allow it to strike yours.
- Your animals' (collective) strength is higher, so the enemy will look for an enemy unit to merge with.
- Since there are no units within its movement range, this unit will return to the ruler's position.
Scenario B: If it was your turn; you could attack and defeat the enemy. Move the cube of that units' color to the enemy. Remove the enemy hex from the board.
6.1.3 Move Own Units
Then move a unit of your own, all starting from the left origin tile. They can form groups of two cards, represented by the cubes (and backside of the dawn-day-dusk-night tiles). Your animals can only move according to (part of) their paths on their cards.
6.1.4 Reaching Enemy Location
When you move into the enemy's location ![]() , all remaining enemy units move there as well and count as one unit to defeat.
, all remaining enemy units move there as well and count as one unit to defeat.
6.2 Battle Win
Place or flip the coin on the area on the ally side (white background) of a suit you have on your hand. When you won a battle in a stronghold, remove the stronghold tile from the area. Take a Battle bonus tile from the bag. Place it on any of the four Battle/Alliance tile bonus spaces your player board. This bonus tile is now active for the remainder of the game.
If there are more than four tiles, you may place the tile on top of a current tile or discard it.
6.3 Battle Defeat
If you lose the battle or when the battle ends undecided/you retreat, immediately move your band out of the Ruler's area to any adjacent area. If possible, place a stronghold tile for this area on one of the two spaces on the tatra map next to this area's faction coin.
6.4 Battle Action End
Place the four Battle tiles at the bottom of their stack in the order they appeared (last tile at the very bottom).
7. Alliance
Thematic alliance text.
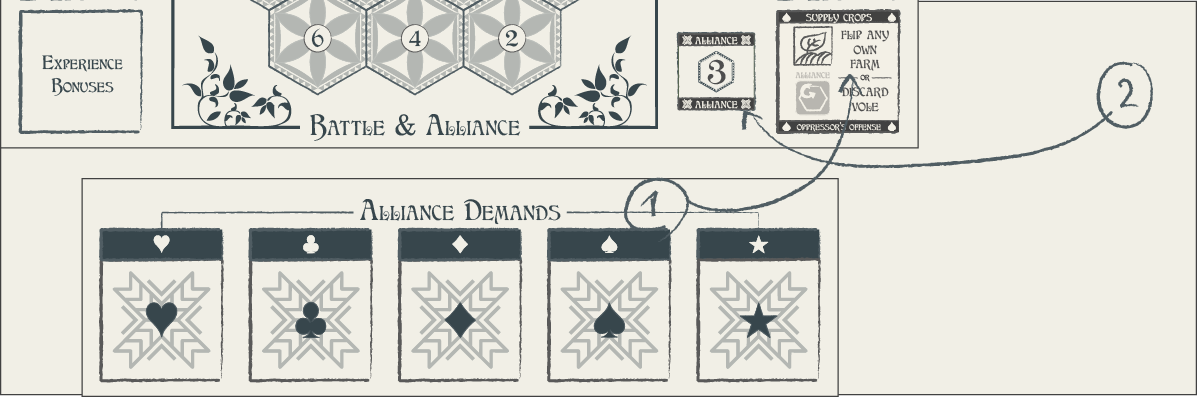
When you are in an enemy area (coin with dark background), you can choose to negotiate an alliance. Alliance Tiles ![]() are used to negotiate with the Area ruler’s government. Destroying farms and fisheries causes enemies to have less demands (one tile less).
are used to negotiate with the Area ruler’s government. Destroying farms and fisheries causes enemies to have less demands (one tile less).
Treasure ![]() can be used to instantly form an alliance. Flip the tile to the dark side when using treasure. Treasure doesn't require a card to supply it.
can be used to instantly form an alliance. Flip the tile to the dark side when using treasure. Treasure doesn't require a card to supply it.
You can reveal Alliance Tiles through the Negotiate (5.5) action to have more information before going into negotiations.
7.1 Alliance Procedure
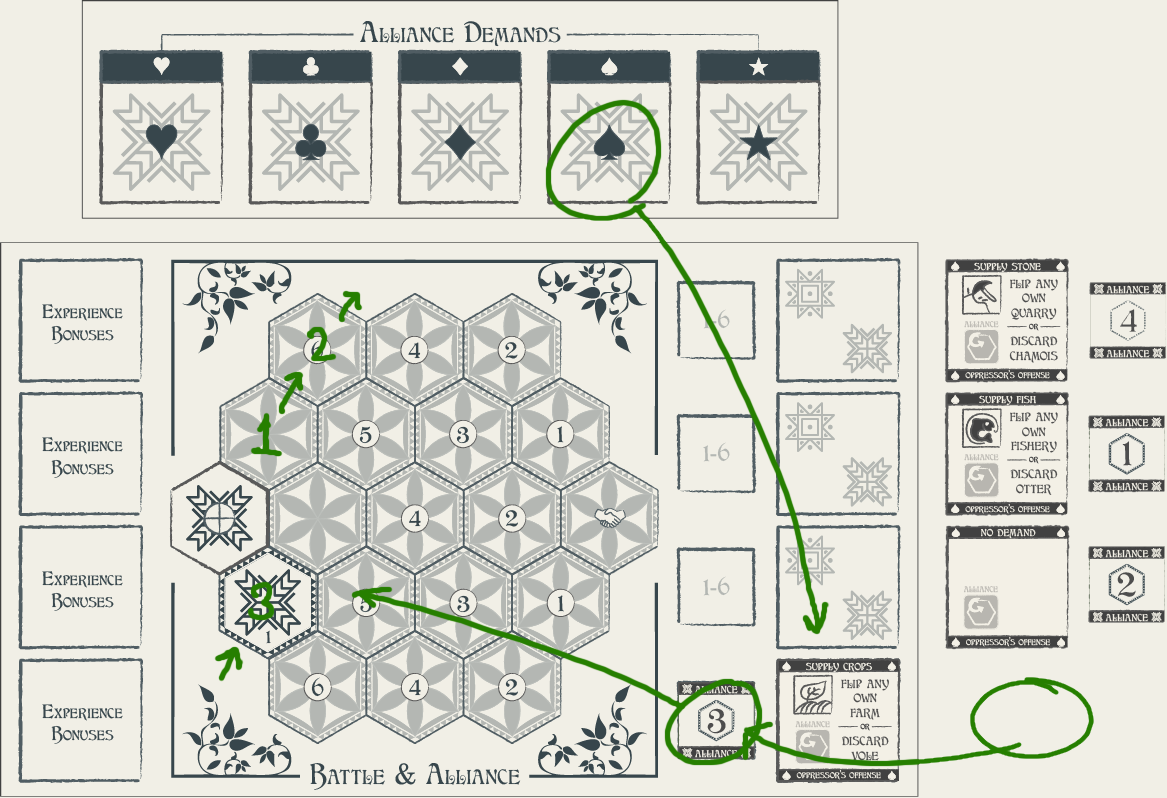
When you are in an enemy area ruled by spades:
- draw the top alliance tile from the stack at "Alliance Demands" and place it on the bottom space right of the Alliance Board.
- Draw a position tile and place it Alliance side up.
- Place the hex (#1 for first demand) on the position; as the alliance position tile say 3, the hex tile moves three steps from the base position.
- Then place the second group of tiles (A), then the third group (B), then the fourth group (C).
7.1.1 Draw Alliance Tiles
If there are any Battle tiles on the track, remove them and their position tiles. Draw and reveal the remaining Alliance tiles in bottom to top order. Draw the Battle/Alliance position tile ![]() for each Alliance tile and place with the alliance side face up.
for each Alliance tile and place with the alliance side face up.
7.1.2 Place Hexes
Place the demand tiles ![]() on their positions, moving from the bottom to top on rows, and left to right on columns.
on their positions, moving from the bottom to top on rows, and left to right on columns.
7.1.3 Fulfilling Demands
Use your animals cards' moves to move to the Ruler's government space. Your animals can only move according to (part of) their paths on their cards (may be improved by the abilities on Battle bonus tiles).
Place the animal card in front of you. You may only move to any other demand tile ![]() . When you move onto a demand tile, immediately fulfill that demand. Animals cannot be used twice in an Alliance phase.
. When you move onto a demand tile, immediately fulfill that demand. Animals cannot be used twice in an Alliance phase.
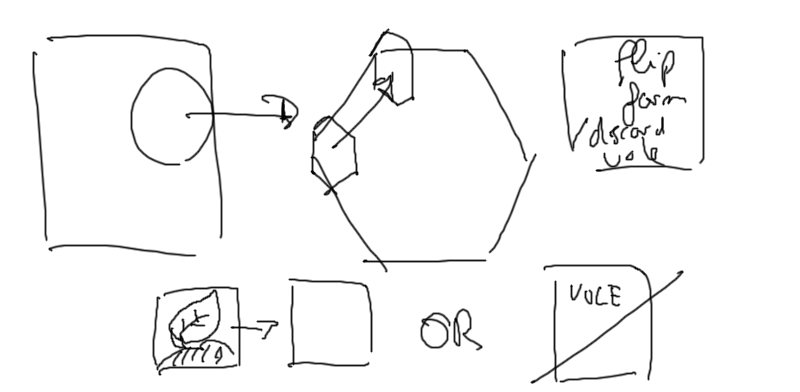
Scenario A: your animal cards' movement allows you to move to hex #1, you move your cube there and then choose to either flip any own farm or discard a vole card. If you choose to flip a farm.
7.1.4 Supplying Demands
If the demanded resource has to come from another allied Area that is only connected through one or more enemy areas, you need to discard a card for supplying each resource. It can be supplied by:
- any of the Clubs cards (if connected bridge/tunnel or open path)
- any of the Stars which can cross any path and also enemy areas
7.1.5 Forming Alliance
If you make it to the Rulers' marker ![]() , you formed an alliance, see 7.2. If you cannot move to another tile or cannot fulfull the demand you moved to, you lose the Alliance negotation, see 7.3.
, you formed an alliance, see 7.2. If you cannot move to another tile or cannot fulfull the demand you moved to, you lose the Alliance negotation, see 7.3.
7.2 Alliance Win
By making it to the ruler’s government, you form an alliance. Flip the coin on the area to the ally side (white background). Take an Alliance bonus tile from the bag. Place it on any of the four Battle/Alliance tile bonus spaces your player board. This bonus tile is now active for the remainder of the game.
If there are more than four tiles, you may place the tile on top of a current tile or discard it.
7.3 Alliance Defeat
If you fail to meet the demands, immediately move your band out of the Ruler's area to any adjacent area.
7.4 Alliance Action End
Place the four Alliance tiles at the bottom of their stack in the order they appeared (last tile at the very bottom).
8. Bonus Tiles
Being strong or a good diplomat is not always enough. Across your journey you will gain a variety of tricks. Even the most daunting enemies and the most stubborn rulers can be overcome. But beware: enemies will learn your tricks!
Anytime you use a Battle or Experience bonus, move the tile down. When moving a tile off the board, put it back into its bag. There is no limit to the number of stacked tiles on a space.
8.1 Battle Bonus Tiles 
- Combat Mounts: require cards of two different suits mentioned, gain +2 in battle.
- Ranged Attacks (air siege, onagers, javelins, catapults, archers): cards from this suit can attack adjacent space without being hit and eliminate a target of the value shown.
- Battle Bred: all cards of this suit gain +1 in battle.
8.2 Alliance Bonus Tiles 
- Strategic Words: Swap two tiles (#1, #2, #3 or #4) to any open spaces when playing a card of this suit in front of you.
- Aligning Needs: Move a #1, #2, #3 or #4 tile to any open space when playing a card of this suit in front of you.
- Asking Favors: Play a card of this suit in front of you to not have to fulfill this demand.
9. Scoring
The game ends when any of the following conditions are met:
- all areas have been conquered or allied; all coins on white side (gain five points)
- all wooden cubes are placed on the Beasts and Spirits cards
- the deck of beast and spirits is exhausted (you have to draw a card and cannot)
Score the points from your goal card. Add three points for every wooden cube, treasure and dragon tile left.
Please record the score of each game.
Updates
- All birds (stars) have "supply from anywhere" instead of "Draw two area cards", see animal cards.
- All deer and chamois (clubs) have "supply from connected" instead of "Negotiation: +1 supply", see animal cards.
- 23/4: removed end game condition "any animal deck is exhausted", Drak, Smok and Krol Wezy from the Beast and Spirits deck updated (see updated image in 4.2.1).
- 26/4: updates/clarifications for 3.2 and 3.3 (setup); 4.2.2 benevolent left, and malevolent right, fully updated.
- 27/4: further updates on 5. Actions.
- 28/4: More clarifications, added step in 3.3 to draw two experience bonus tiles.
- 11/5: Updated battle and alliance examples, added examples for recruit, scout, negotiate, develop and construct.
- 18/5: Major update:
- removed timeline tiles (dawn, day, dusk, night).
- scout and negotiate now possible by any animal, doubled by animals with this action on their cards.
- added more icons in rules.
- beast and spirits are now only replaced if there are no cubes on card.
- using battle and alliance bonuses moves the tiles down, so you can only use them four times.
- setup: industries and buildings specified per region.
- battle/alliance bonuses can be discarded.
- new chapter (8) for detailing Battle and Alliances bonus tiles.
- subheadings added for battle and alliance procedures.
- small thematic texts added for each action.